I have finally finished my latest drawing after about 9 months of off and on work! I would argue it is my most complex drawing yet, so read on to find out more.
First off lets see the final product, and then I will describe the process for how I got there.
![]()
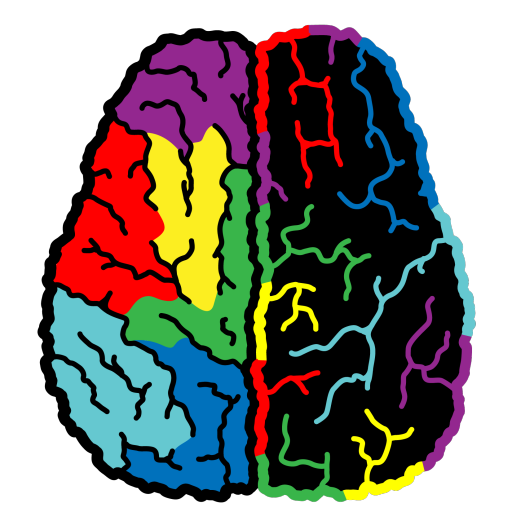
Pixelated Thoughts is a combination of abstract thinking and fine grained detail, tied together with the focus of the blurred face deep within the colors. There are a certain number of features and complexity at each layer, so lets start breaking them down.
First we start with the subject, lets call her J.
This is a selfie from her that I received – little did she know what this was going to turn into! Next we greyscale, crop, and scale down the selfie.

Yes, the picture is only about 60 pixels high! We then apply an Ordered 2×2 Dither, which generates us 8 different shades of grey to work with. This dither allows for proper fading and shadow retention, while doing a pretty good job at preserving the original image. The dither chunks our original picture colors into only 8!

After that, I wrote a python script to convert the greyscale image into colors, Here is a screen shot of it below.
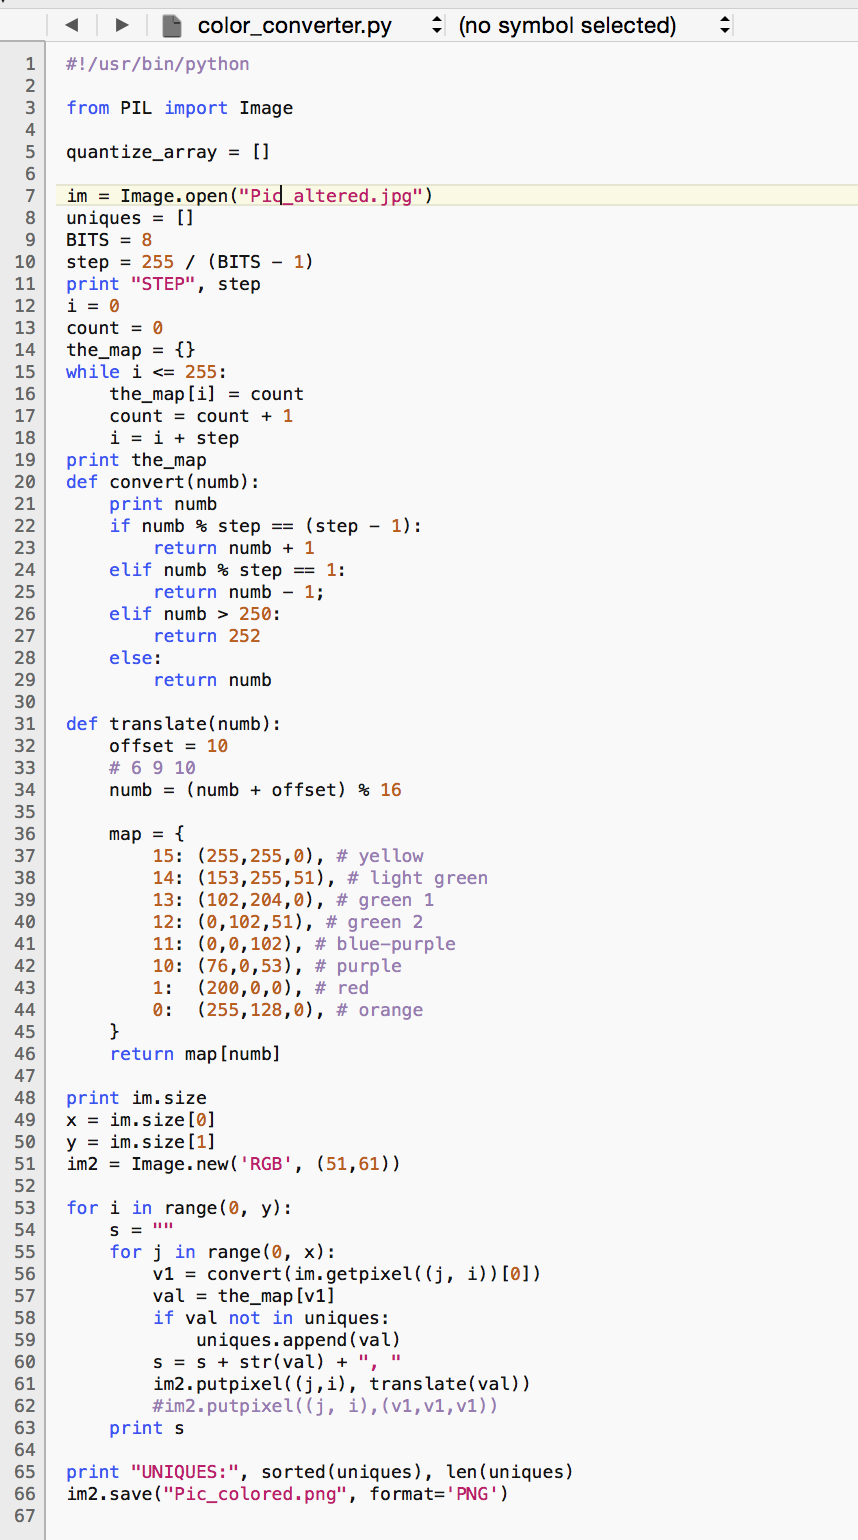
Note that this may not be the final script, but I think you get the idea. The output of running this script on the grey-scaled and dithered picture is shown below, and it also generates a Comma Separated Value file representing the color at each pixel (not shown):

My goal every time I draw is to use every color of the rainbow, and I think I captured the original image pretty well while adhering to that idea. From here, I figured it may be easier to translate this picture onto my large drawing via an excel spreadsheet. This is more like a color by numbers approach, where each cell represents 1 pixel of the image, and has a value 0-7 according to what color I wanted in the cell. So I took the CSV and imported it into the mac equivalent of Excel.
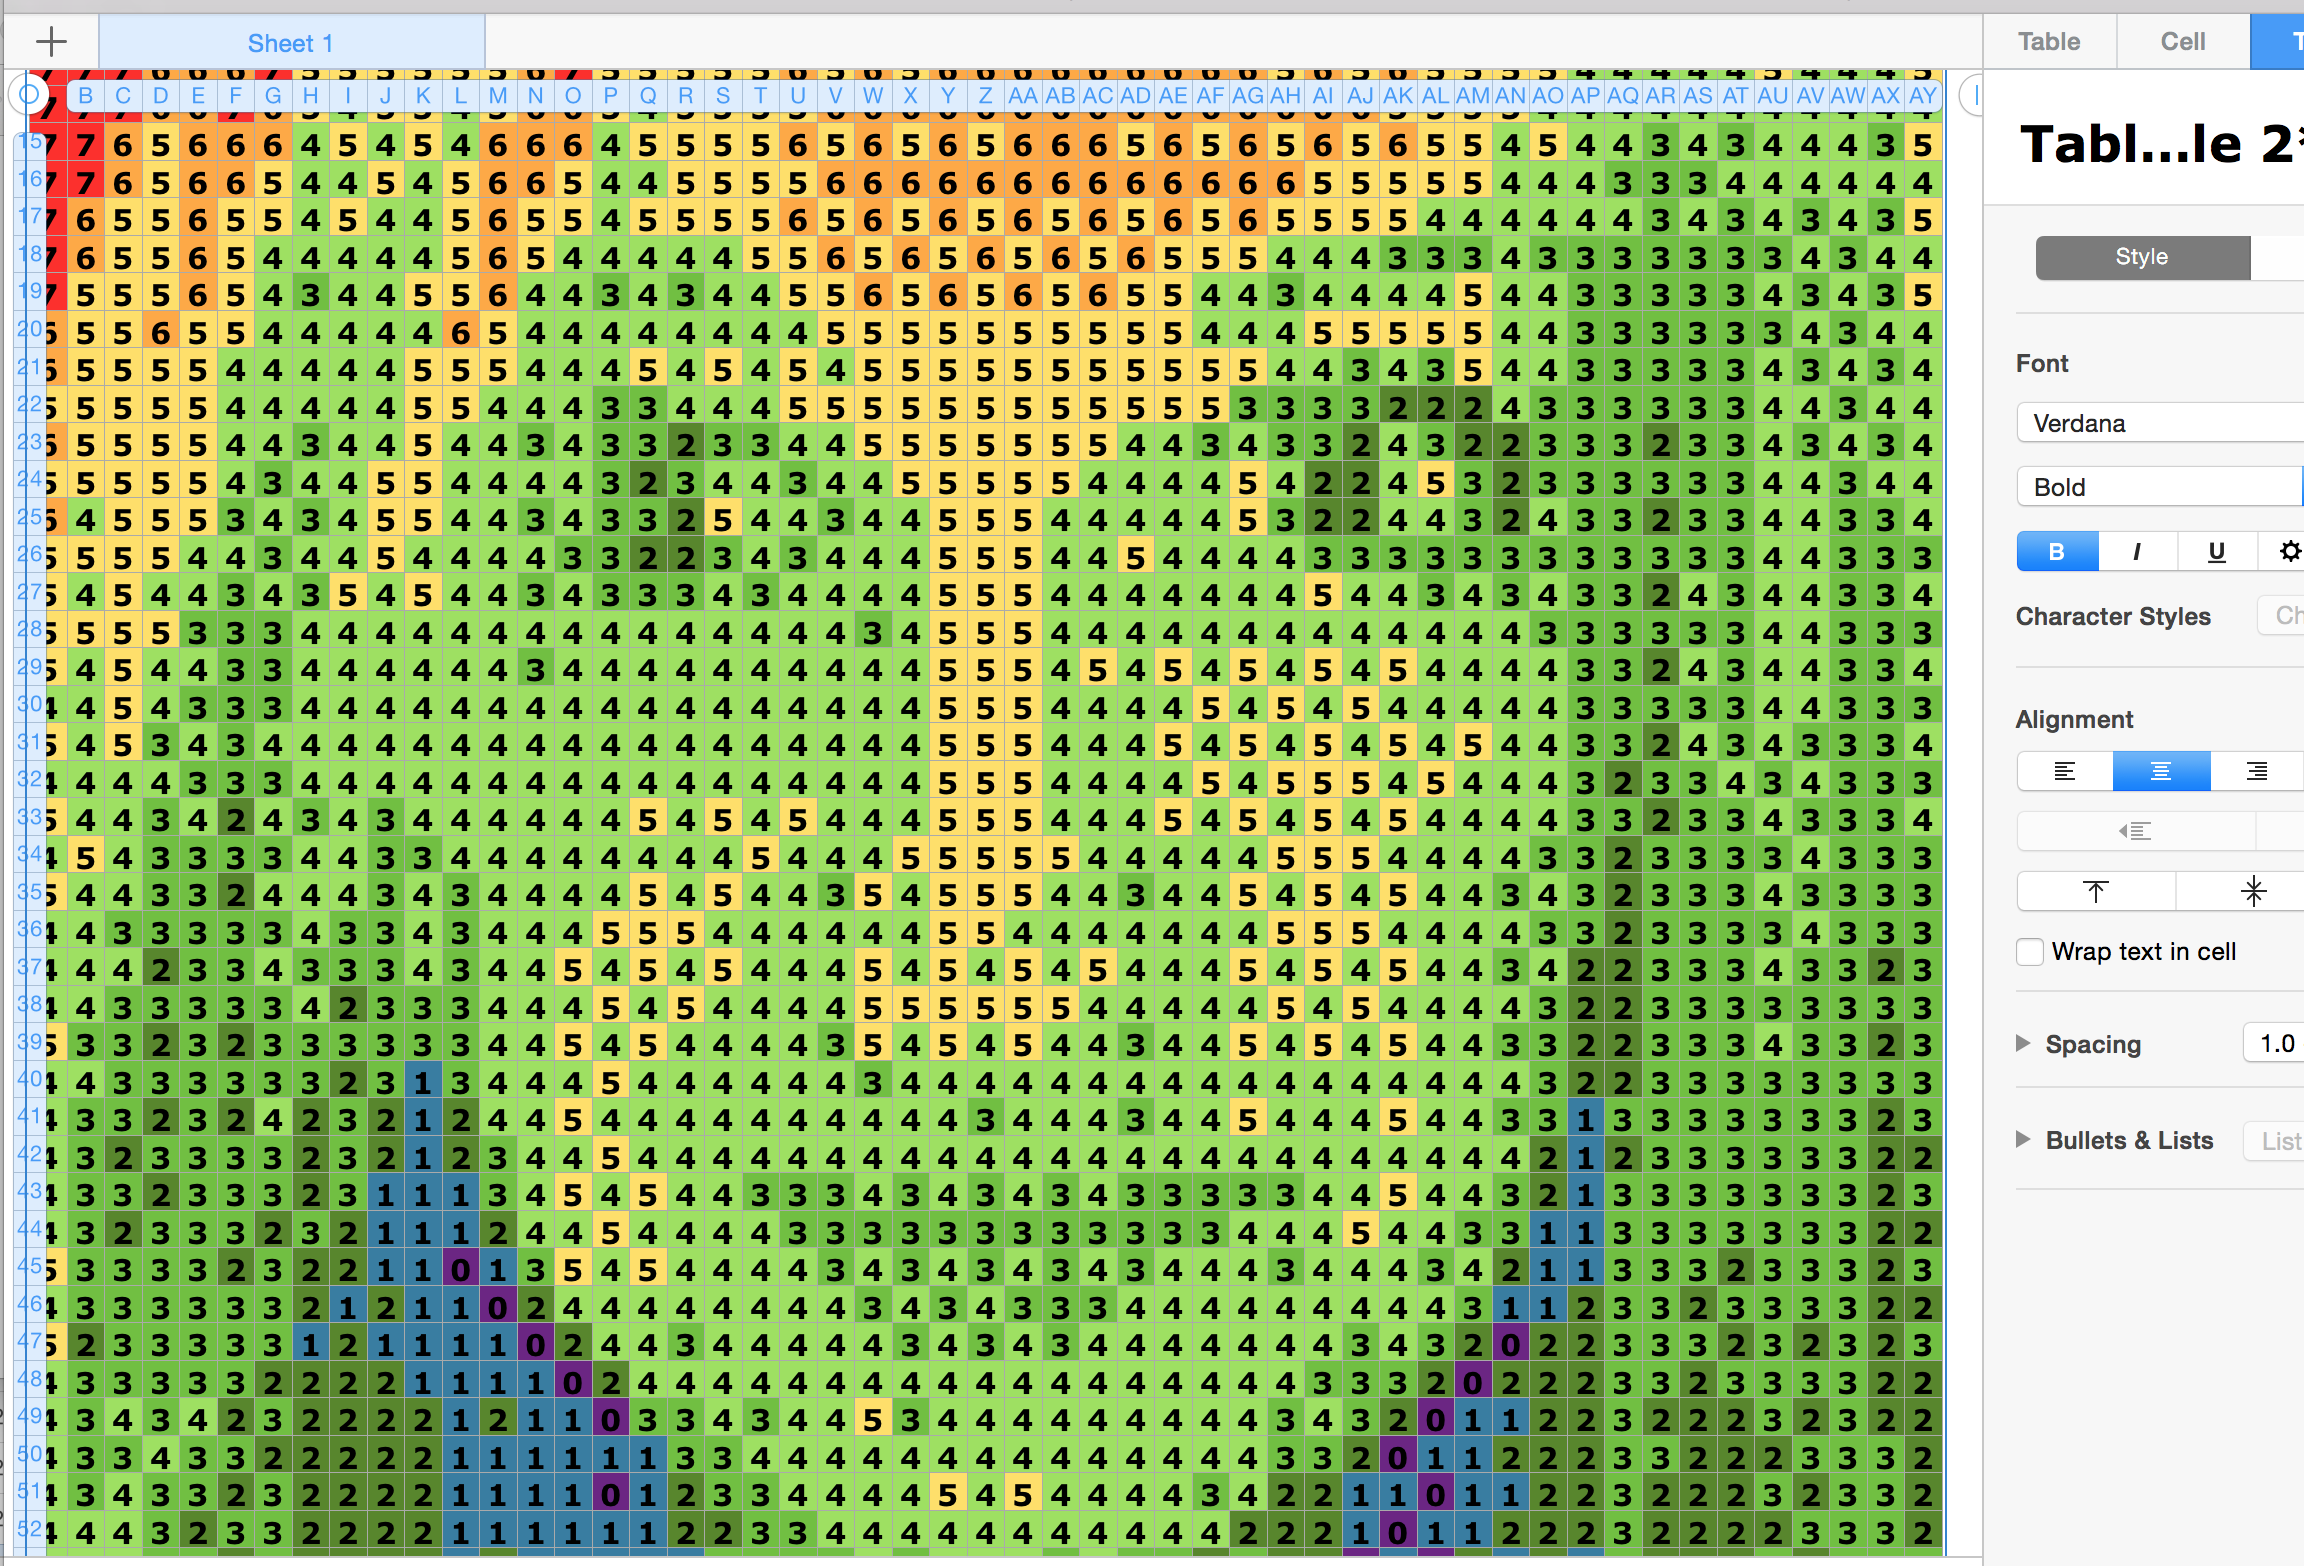
When I printed this out, I decided it was too hard to read and too hard to follow each cell without making a mistake. Instead, I just printed the original colored dithered file out on a whole sheet of paper.
Now, I had my colored subject, so it was time to get to work on the real life pixels. I used a t-square and a drafting triangle to draw parallel and perpendicular lines on my bristol paper where I would lay my drawing. If I recall correctly, each square is about 1 cubic cm.
By now, you probably see where the “Pixelated” comes from, which is that the drawing is conveyed in a very computer-like and pixelated fashion. But what about the “Thoughts?” Well, during all this time I had been thinking about the message that I wanted to convey, some level of confusion, helplessness, and wonder all at the same time. I certainly could have taken the route I initially had in mind, which was to simply color the squares and draw a pattern on top of them. But in thinking about it more and more, I had a grid to work with, why not create some kind of crossword puzzle as well?
I brainstormed and I brainstormed, trying to figure out how to overlay a crossword puzzle into this grid. First, I had to come up with the messages and words I wanted to use:
- Help me
- Save me from myself
- How did I get in here?
- Who are you?
- etc.
These were the kinds of things I was toying with, and I came up with around 20 different ones. In order to better hide my message, I decided that my crossword puzzle would not be an ordinary puzzle, as it would reuse letters too. For example, a capital M is an upsidedown W. An E can also be an M, W, or 3, depending on the font I chose, and depending on which way you looked at the letter.
I ended up finding the smallest size readable font I could, which means I spent a lot of time at sites like these. Once I found my font, I then began figuring out how the letters could line up depending on which way I viewed them, and began calculating the number of letters I could actually fit into my ‘grid’.
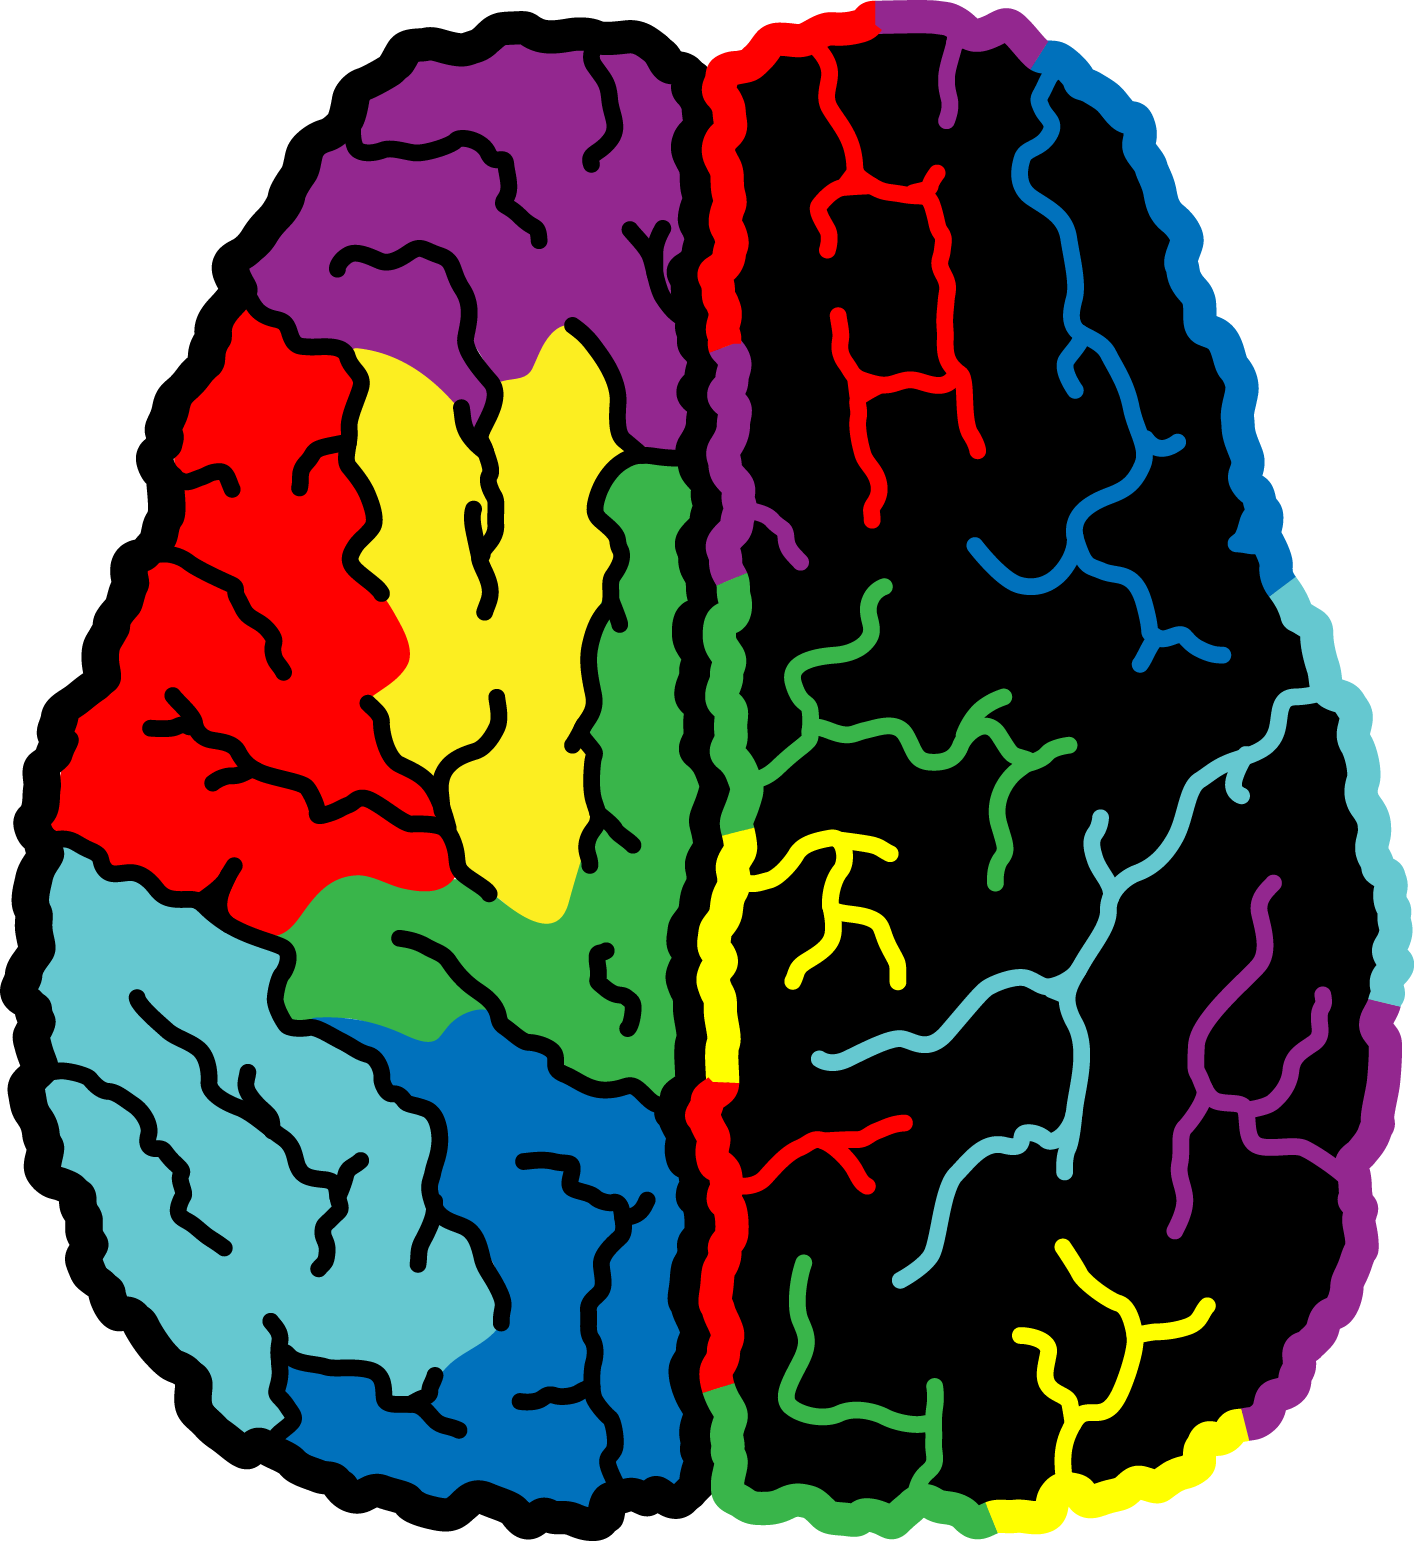
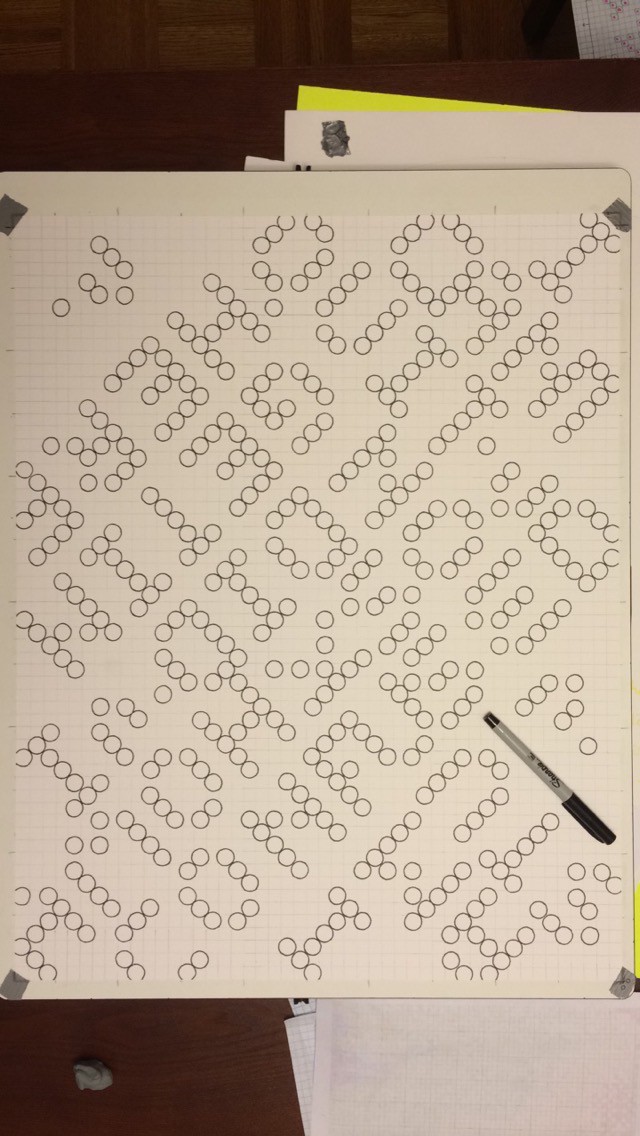
I decided to use circles instead of squares to distinguish my crossword messages, giving them a slight pop that there is something there or ‘off’. This is the result of my crossword brainstorming:
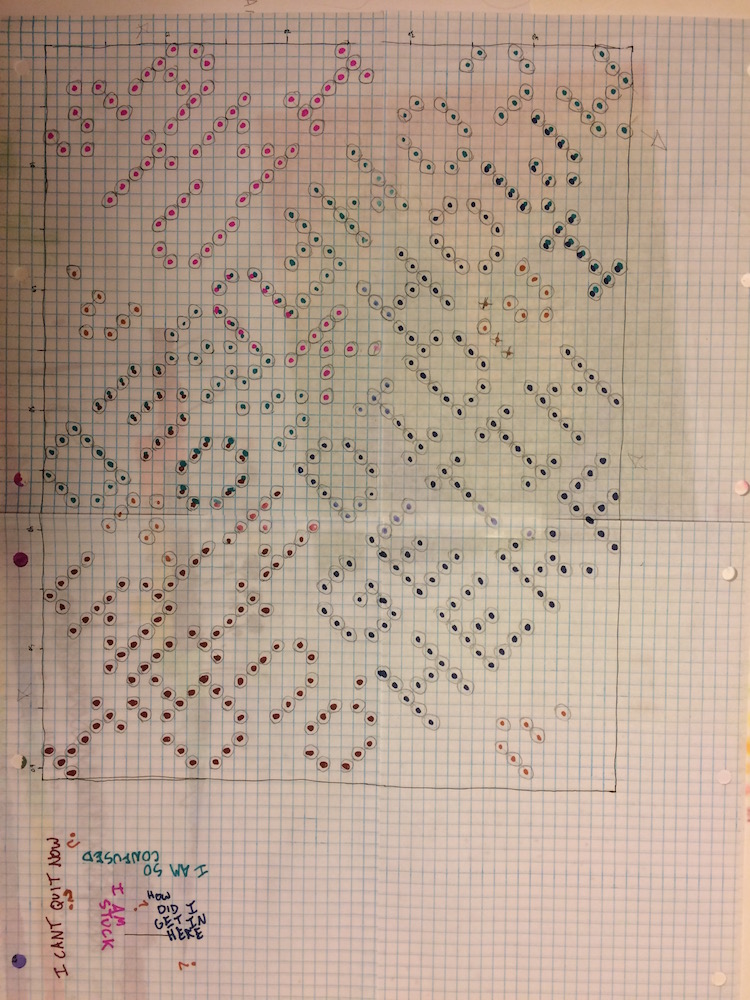
Note that in order to use circles instead of squares, I had to rotate my letters 45 degrees within the grid. This severely shrunk my available letter realestate, and some of the letters had to fall of the edge of the paper. I settled on these 4 messages:
- I am stuck
- How did I get in here
- I can’t quit now
- I am so confused
Each message is rotated 90 degrees from the other, and uses similar letters that overlap. For example, the letter M in AM is the tail end of the word HOW. The W in NOW is actually the letter E in CONFUSED. The above pictures dots are color coded according to the message it says, and circles with double dots are letters that are shared between messages. I also threw in 4 question marks, in both obvious and non-obvious spots to draw a bit more attention to the messages. To make the viewer look closer at what is behind the colors.
Now, I had to translate that onto my grid.
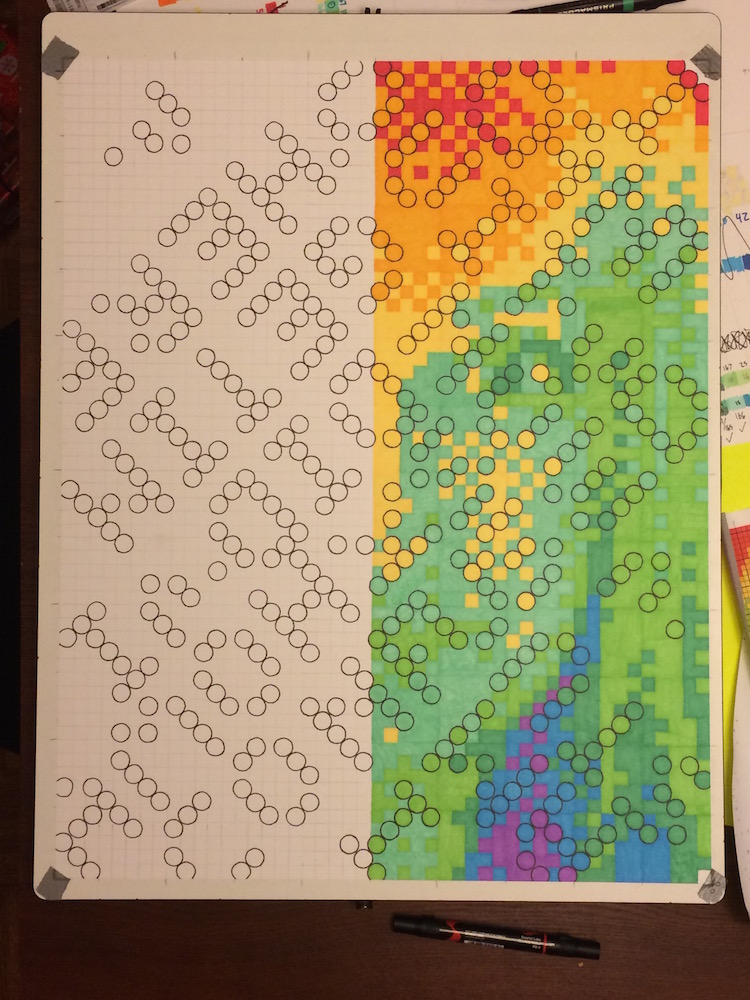
The letters are all there, but lets make them pop a bit by outlining them in black. I was afraid that the circles would be lost in the pixels if I did not give them something that made them stand out.
Pretty easy to see the letters now, right? You can probably read the big “CONFUSED” on the bottom right of the drawing. From here, now I can finally go back to my original colored picture, and begin transferring the colors on to the grid. Here is a snapshot of the transfer about half way done.
I can still see the letters pretty clearly, but did not know how obfuscated they would be once the whole picture was transferred on there. This transfer alone took over 20 hours worth of work! I ended up chunking the original drawing into small 5×5 pixel squares, and then transferring them on one block at a time, and slowly working through each block. In total there were around 3,111 pixels, and approximately 125 ‘blocks’ to do. Here is the result of that step.

Still see the crossword letters? Now, the last step was to add my final layer on top of it all. What initially started off as a doodle of symbols and shapes, quickly because a series of images, stories, memories, experiences, and all things that I hold dear to me. The goal was to make a bunch of small shapes and symbols that obfuscated the layers below, while at the same time preserving the original image.
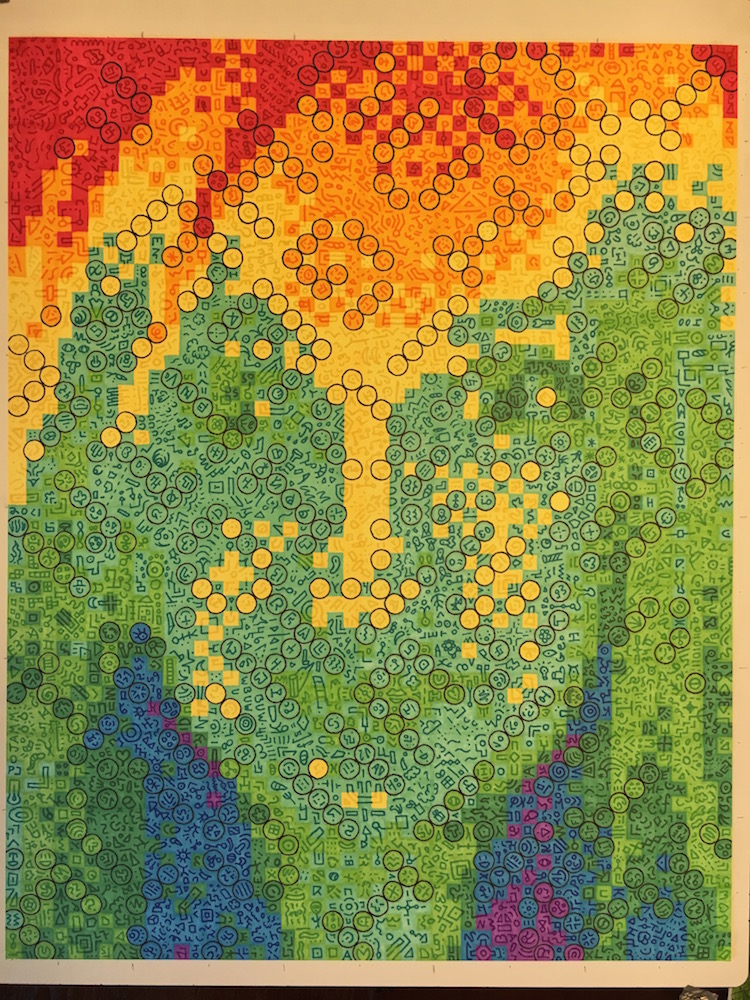
The result looks something like the above from my raw phone. If you look at this closely or at the picture above, you can find some of the following scenes while I let my mind wander:
- Santa, presents, and a chimney
- A pinching crab
- A dirt bike
- A bird flying over the city
- Computer binary
- A shark swimming inside a school of fish
- A ship sailing on the high seas
- A tree in the summer rays
- A spider web
- The Pythagorean Theorem
- An alien abduction
- Falling Tetris blocks
- And so much more!
Overall, the series of events described above for how this drawing came to be took close to 9 months worth of time (July-March), and 50 – 60 hours total. Once I was done, I had to take pictures of it, import it into photoshop, work on splicing, color balancing, and editing the pictures into the final product you see at the top of this post and in my Gallery. This adds a new item to buy in my store as well, as the drawing is done big enough to be printed on Tapestries, Canvases, and Posters. Here is all the scratch paper I ended up using:
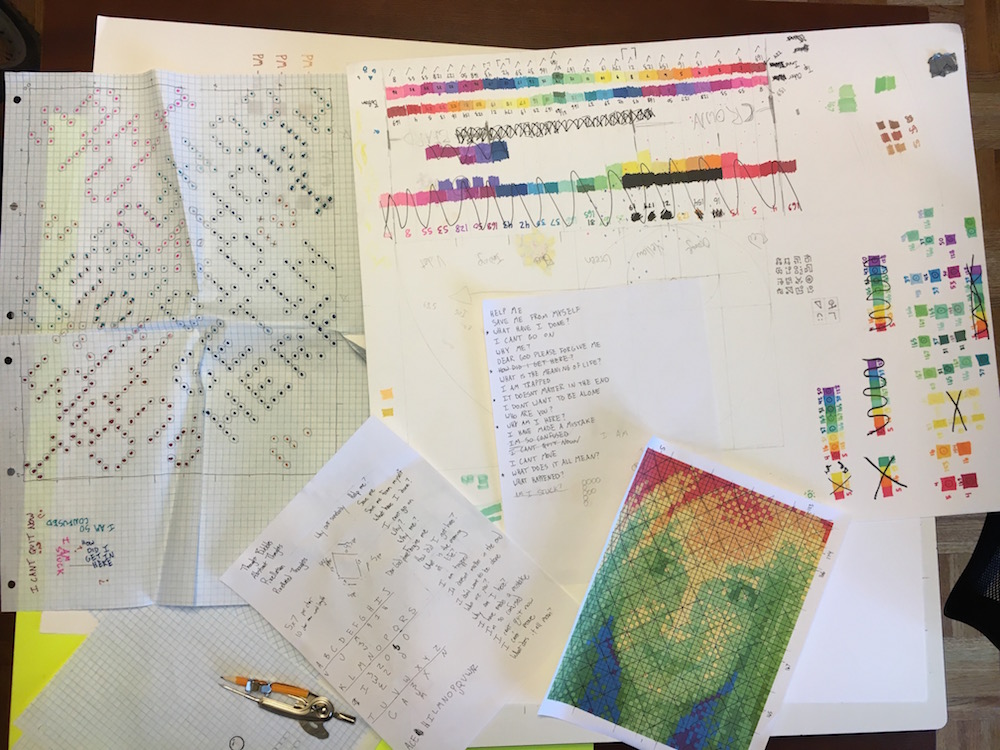
The large colored bands are actually left over from Soundeity, but everything else are tests for what would be laid on the final paper. It brings me great joy to finally get this drawing completed.
That is all I have for this post – until next time.
